Want to control what search engines can and can’t crawl on your website? The robots.txt file is where it all starts. If you’re using Elementor Cloud Hosting, the process is slightly different from a standard WordPress setup. Here’s a quick step-by-step guide.
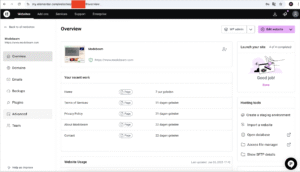
Step 1: Go to Your Elementor Hosting Dashboard
Log in at my.elementor.com and select your website (e.g., modobeam.com).
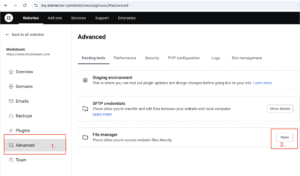
Step 2: Open the File Manager
From the left menu, click Advanced, then click Open next to File Manager. This gives you access to your website’s file system.
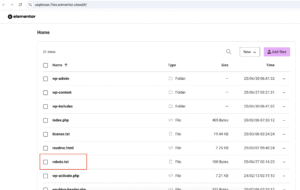
Step 3: Locate and Open the Robots.txt File
Scroll down the file list and click on robots.txt. It will open in a simple text editor.
Step 4: Edit the File
Here you can add or modify rules.

For example:
User-agent: *
Allow: /
Sitemap: https://www.yourdomain.com/sitemap.xml
Pro tip: Want to target specific bots like Bing? Add:
User-agent: Bingbot
Allow: /
Step 5: Save Your Changes
Click Save to apply the changes. The updated file will take effect immediately.
This method allows you to control what bots can access—without the need for additional plugins or complex server access.
Want guidance on SEO best practices for your robots.txt file? Stay tuned for our upcoming guide on creating an optimized robots.txt for better search visibility.