Google Tag Manager (GTM) is one of the most powerful — yet often underused — tools in modern digital marketing. It acts as a control center for all your tracking scripts, conversion pixels, and analytics tags, giving marketers and developers a single place to manage measurement without repeatedly editing the website’s source code.
In this guide, you’ll get a complete introduction to Google Tag Manager: what it is, why it matters, how it works, and how to set it up step by step. We’ll also cover best practices, common pitfalls, and how GTM integrates with tools like Google Analytics 4 (GA4), server-side tagging, and Google Consent Mode v2.
What Is Google Tag Manager?
Google Tag Manager is a free tag management system that lets you manage and deploy marketing and analytics tags — small code snippets — on your website or mobile app without manually editing your source code.
Tags can include anything from Google Analytics tracking, conversion pixels, event scripts, to custom HTML for heatmaps or chat widgets. Once the GTM container code is installed, everything else can be managed through its web interface.
In essence, GTM serves as a single “container” that holds all your marketing and tracking scripts. Instead of asking developers to hard-code changes, marketers can use GTM’s user-friendly dashboard to implement, test, and publish new tags independently.
Examples of Tags Managed in GTM
- Google Analytics 4 (page views, events, conversions)
- Google Ads conversion tracking and remarketing tags
- Meta (Facebook) Pixel and other social media pixels
- LinkedIn Insight Tag
- Hotjar or Microsoft Clarity heatmaps (learn more)
- Custom scripts for chat tools, surveys, or cookie consent
Once set up, you can manage hundreds of tags, triggers, and variables within a single dashboard — no developer required.
Why Google Tag Manager Matters
In today’s data-driven marketing environment, fast and accurate implementation of tracking is crucial. GTM simplifies workflows, increases collaboration between marketing and development teams, and reduces the risk of errors caused by manual code editing.
1. Faster Deployment
Without GTM, every tracking script or pixel needs to be hard-coded into your website. With GTM, marketers can launch new campaigns, events, or experiments instantly — without waiting for a developer sprint. This shortens feedback loops and accelerates growth testing.
2. Error Reduction
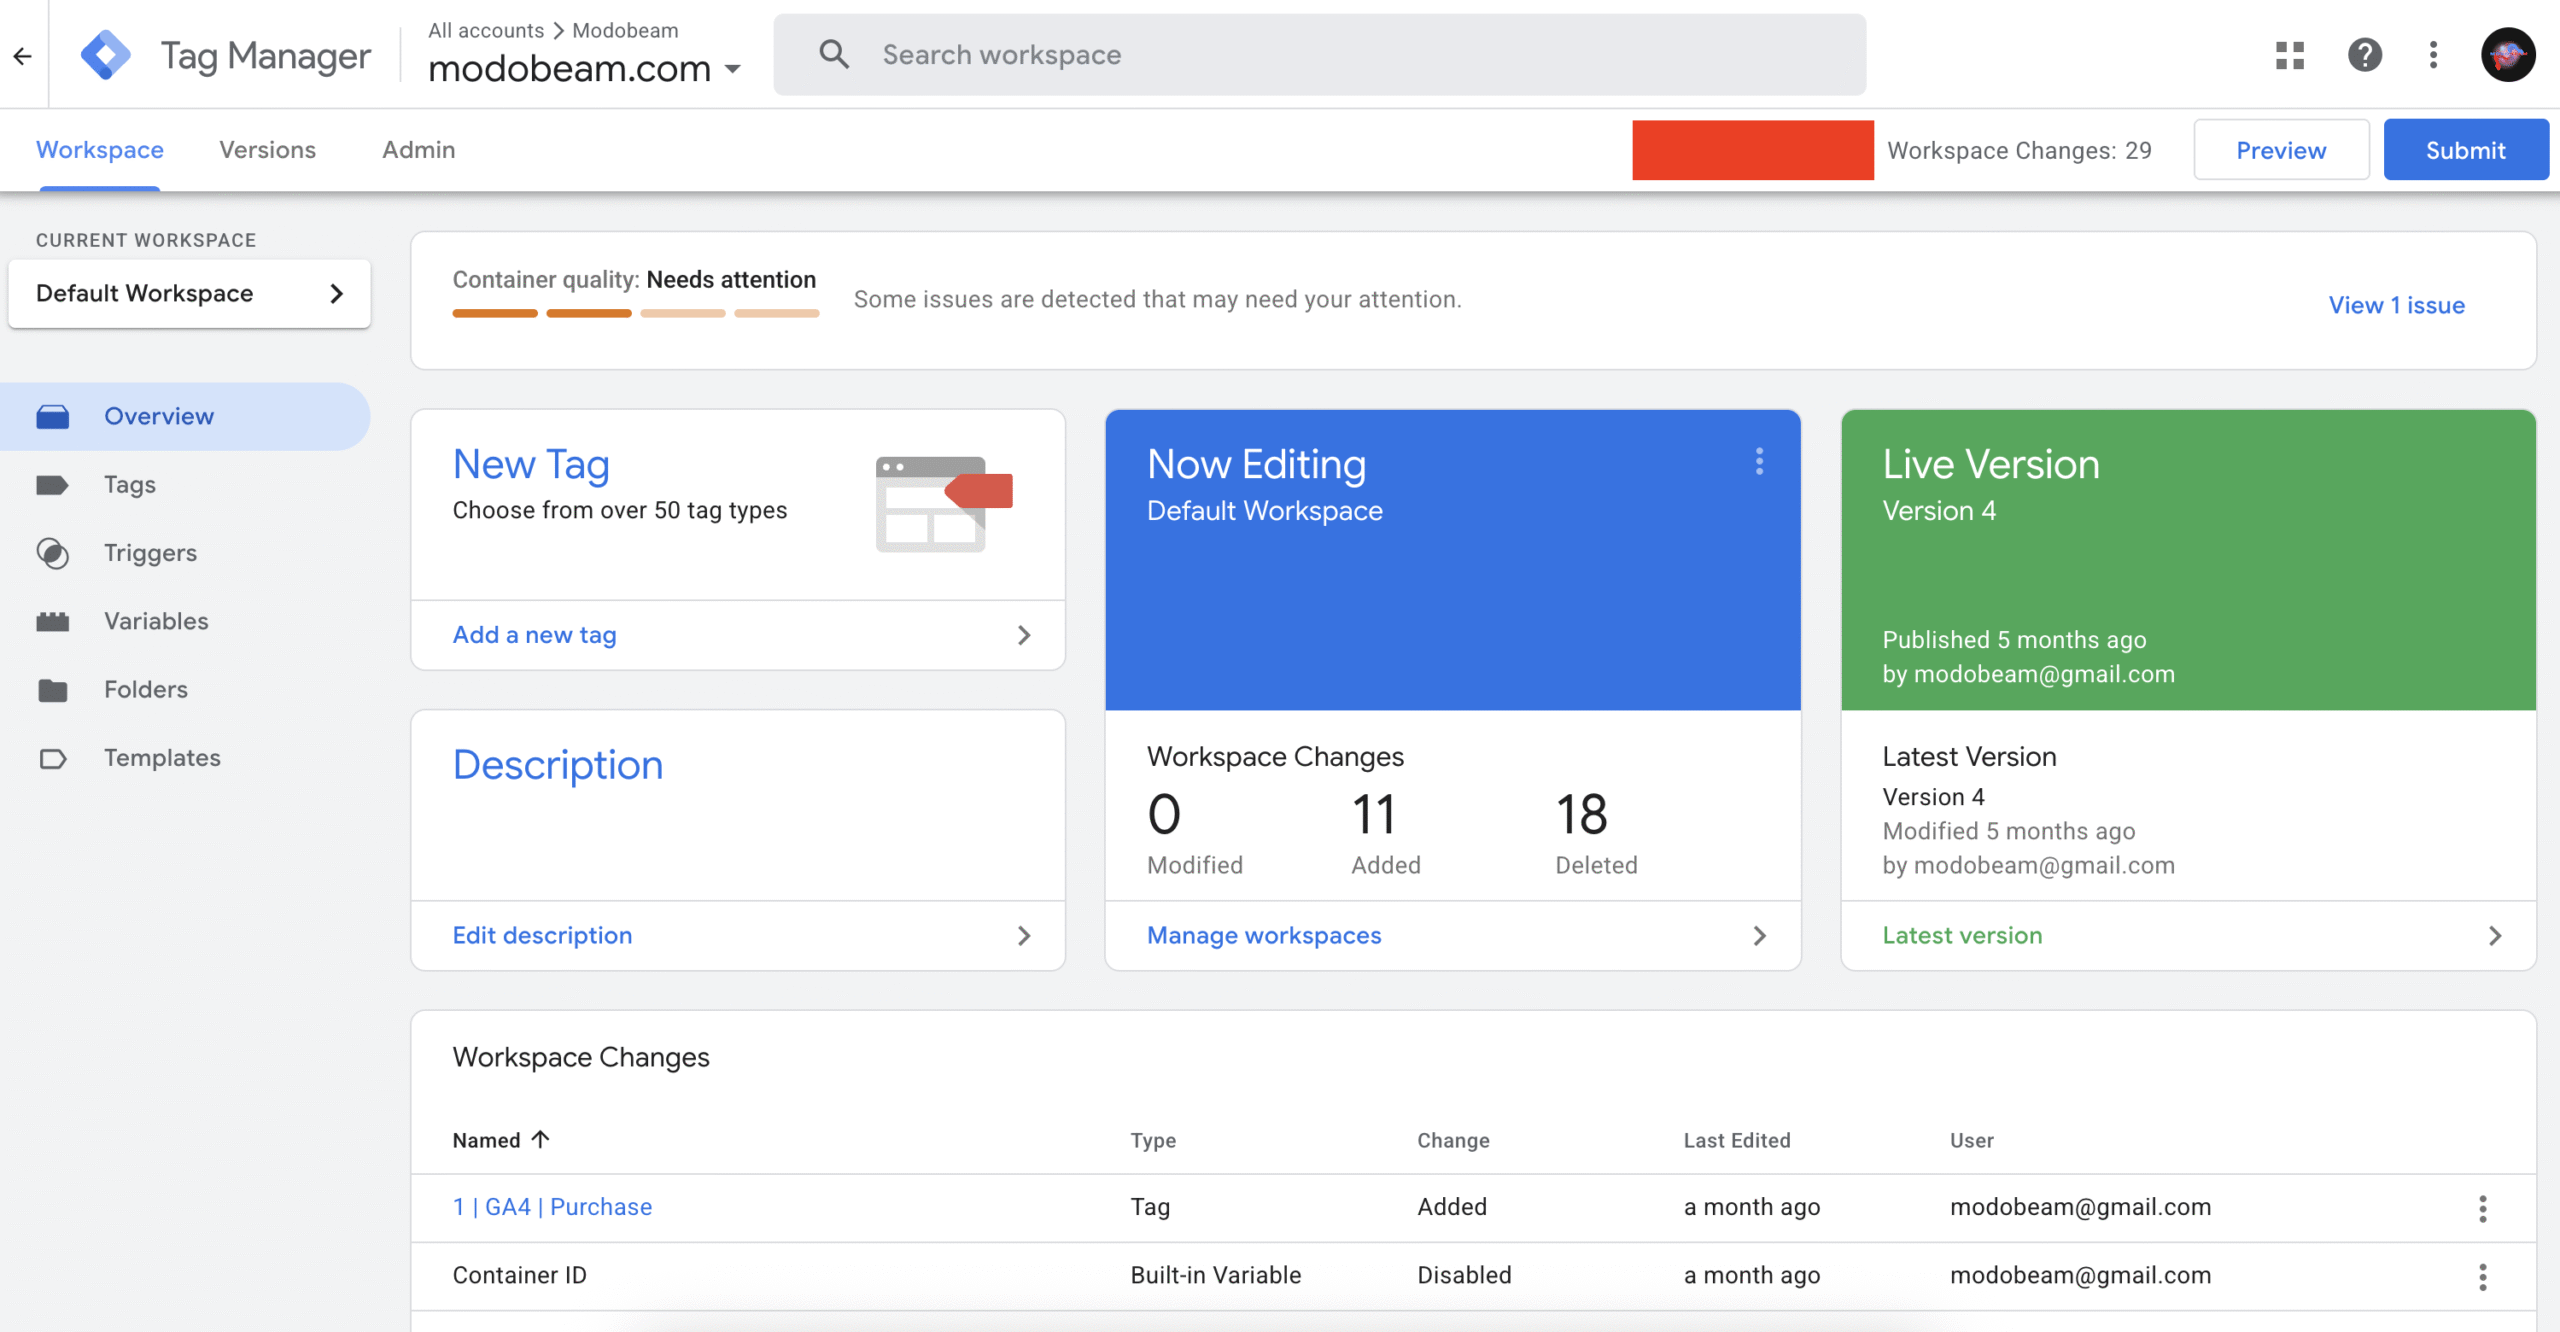
GTM’s built-in Preview & Debug mode lets you test everything before going live. You can see which tags fire, which don’t, and what triggers were activated. If something breaks, you can easily roll back to a previous version using version control.
3. Centralized Code Management
Instead of multiple scattered snippets throughout your site, GTM consolidates everything in one clean container. This keeps your website codebase light, organized, and easier to maintain.
4. Advanced Tracking Without Development Bottlenecks
Through features like custom variables and the Data Layer, GTM enables advanced event tracking such as scroll depth, form submissions, and custom e-commerce events — all without modifying the site’s core files.
5. Privacy and Compliance
GTM integrates seamlessly with consent platforms like Google Consent Mode v2 or Cookiebot, allowing you to respect user consent preferences while still collecting compliant analytics data.
How GTM Works
At its core, GTM works by embedding a container code snippet on your website or app. That container then loads all the tags you configure in the GTM interface. Each tag is linked to one or more triggers that define when it should fire (e.g., page load, button click, form submission).
Key Components
- Tags: The scripts or tracking pixels you want to deploy (e.g., GA4, Ads, Facebook).
- Triggers: The conditions under which a tag fires (e.g., all pages, click events, scroll depth).
- Variables: Reusable pieces of data used by tags and triggers (e.g., Page URL, Click Text, or custom Data Layer variables).
- Data Layer: A structured JavaScript object that stores dynamic data — for example, user IDs, product details, or purchase values — that tags can use for more advanced tracking.
Each time a page loads, GTM checks whether any triggers are activated. If so, the relevant tags fire instantly, sending data to analytics or ad platforms.
In short: GTM bridges the gap between your website and your analytics ecosystem — efficiently, securely, and with full control.
Setting Up Google Tag Manager (Step-by-Step)
Now that you understand the basics, let’s walk through how to install and configure GTM correctly from scratch. These steps work for most websites and can easily be adapted for platforms like WordPress, Magento, or Shopify.
- Create an Account and Container
Go to tagmanager.google.com and create a new account for your company or project.
Each site or app usually gets its own container (Web, iOS, Android, or AMP). - Install the GTM Snippet
After creating the container, GTM generates a unique code snippet (for example,GTM-XXXXXX).
Paste the script directly after your site’s<head>tag and the optional<noscript>version immediately after the opening<body>.
This ensures proper tag loading and fallback for users without JavaScript. - Add Core Tags
Once installed, start with essential tags such as:
– GA4 Configuration tag (page-view tracking)
– Google Ads conversion tag
– Meta Pixel or LinkedIn Insight tag
You can always expand later with event-based tags or remarketing scripts. - Define Triggers & Enable Variables
Use “All Pages” for global tags like GA4 page views, and create specific triggers for button clicks, form submissions, or scroll depth.
Enable built-in variables such as Page URL, Click Text and Form ID to make these triggers dynamic. - Preview & Debug
Before publishing, activate Preview mode. This opens a debug window showing which tags fire on which actions.
Test multiple pages, check the data layer output, and ensure that tags trigger only when intended. - Publish and Version Control
When everything works, click “Submit” and publish your container with a clear version name (e.g. “Initial Setup Q1 2025”).
You can roll back to older versions anytime — ideal for troubleshooting.

The Data Layer
The Data Layer is a JavaScript object that acts as a bridge between your website and GTM.
It contains structured data (such as transaction values or user IDs) that can be used to trigger tags or populate analytics parameters.
window.dataLayer = window.dataLayer || [];
window.dataLayer.push({
  'event': 'purchase',
  'transaction_id': 'ORD12345',
  'value': 59.99,
  'currency': 'EUR'
});
By pushing data this way, you enable precise tracking of actions like purchases or form submissions.
Always coordinate with your developer to ensure the Data Layer follows a consistent structure — especially important for e-commerce sites.
Want to go deeper? Check out our post on server-side tagging to see how the Data Layer interacts with server containers and privacy-safe tracking.
Preview, Debug & Version Control
One of GTM’s biggest advantages is its testing workflow.
With Preview mode, you can see exactly which tags fire on each page and why.
Use it to verify trigger logic and variable values before publishing.
- Preview Mode – Shows all tags that fired, the Data Layer events triggering them, and variables in real time.
- Tag Assistant (Chrome Extension) – Useful for debugging live containers and checking Consent Mode status.
- Versions – Each published update is stored as a version. You can review notes and revert instantly if something breaks.
This controlled workflow ensures accuracy and protects your site from erroneous code deployments.
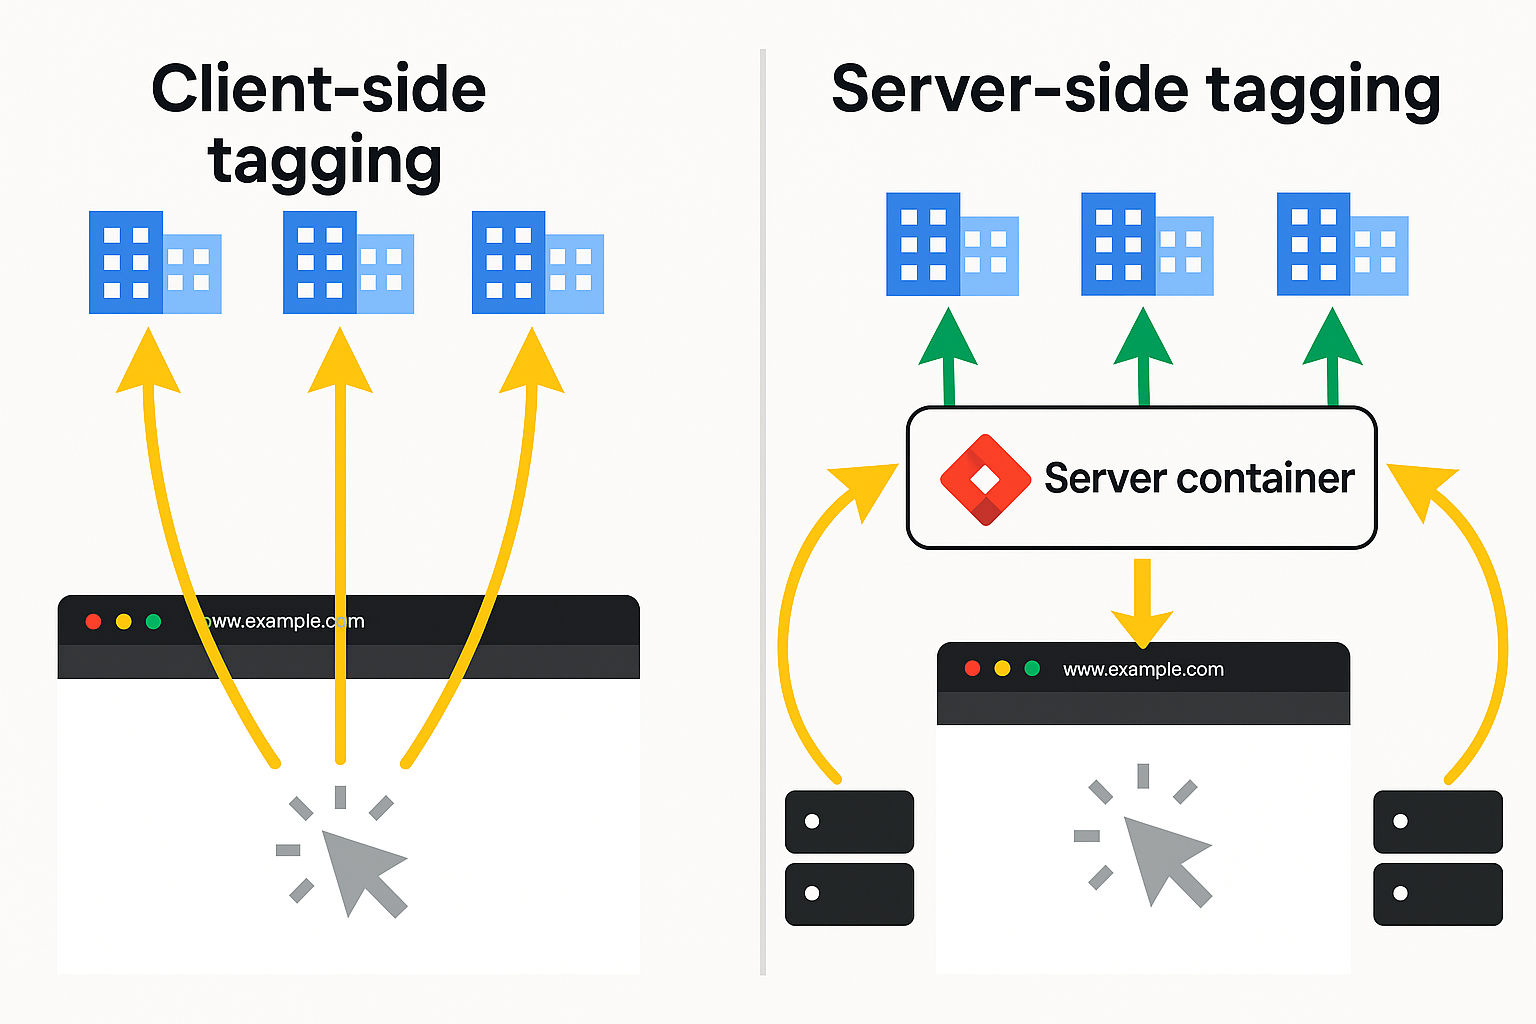
GTM for Server-Side Tagging
As privacy regulations tighten and browser tracking restrictions increase, many organizations are switching to a server-side GTM container.
Instead of sending data directly from the user’s browser to third parties, data is first sent to your own secure server, where it is processed and forwarded selectively.
Advantages include better performance, increased data control, and improved privacy compliance under GDPR.
You can learn more about the differences between web and server containers in our article GTM Web vs Server Container.
Best Practices for Managing Tags
- Use Descriptive Naming Conventions – Label items clearly (e.g.,
Tag – GA4 – Purchase,Trigger – Click – CTA). It saves hours of troubleshooting later. - Leverage the Data Layer – Avoid scraping the DOM for values; push structured data instead.
- Keep Containers Clean – Archive old tags and triggers you no longer use. A lightweight container loads faster.
- Use Environments – Separate Development, Staging and Production containers to test changes safely.
- Document Each Change – Maintain a changelog with date, author, and purpose for each version.
- Test Consent Implementation – Ensure that tags only fire after user consent when required. See our guide on Consent Mode v2.
Common Mistakes to Avoid
- Installing the Snippet Incorrectly – If the script is not placed in the correct
<head>and<body>positions, some tags may not fire properly. - Overusing Custom HTML Tags – Whenever possible, use built-in templates to ensure better security and fewer errors.
- Skipping Testing – Never publish without Preview mode. A simple typo in a trigger can break entire campaigns.
- Ignoring Consent Requirements – Sending tracking requests before consent can violate privacy laws and skew data.
- Not Using Server-Side Tracking – Modern privacy changes make client-side tracking less reliable; server-side is the future.
Conclusion
Google Tag Manager gives marketers and analysts the freedom to implement, test, and optimize tracking independently — without touching website code for every small change.
It centralizes data collection, improves collaboration, and supports advanced setup such as server-side tagging and Consent Mode v2.
Whether you manage a simple blog or a large e-commerce platform, GTM is an essential tool for accurate, scalable measurement.
Next, explore our related guides to level up your tracking skills:
- Understanding Variables in GTM
- Server-Side Tagging Explained
- Google Consent Mode v2 Implementation Guide
- Beginner’s Guide to Google Analytics Reports
By mastering Google Tag Manager, you gain control over your data — and the confidence to make better marketing decisions based on clean, reliable insights.